Gridinsoft Anti-Malware Setup & Scan Guides
Clean Your PC in 4 Minutes: A Beginner’s Guide
-
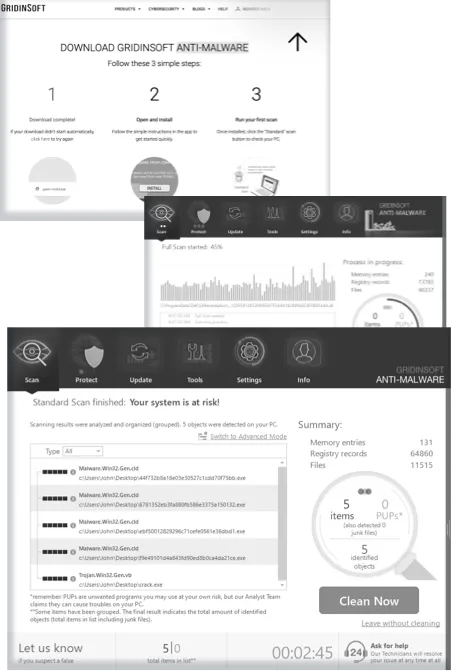
Download & Install
Visit the official Gridinsoft website and navigate to the Downloads section. Select the version compatible with your Windows OS (11, 10, 8, or 7). Click the Download Now button, then run the installer. Follow the on-screen prompts—agree to the terms, choose your installation directory, and finalize the setup. Ensure your PC meets the minimal requirements (1 GB RAM, 300 MB disk space) for optimal performance.
-
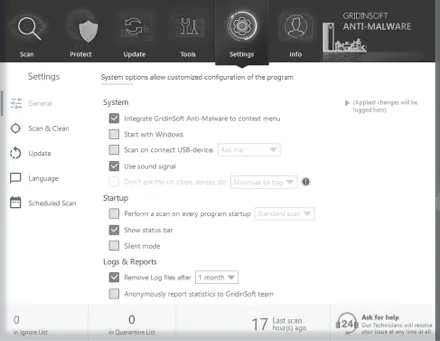
Launch & Configure
Open Gridinsoft Anti-Malware from your desktop shortcut or Start menu. Upon first launch, review the default settings: real-time protection is enabled, and scan schedules are preset to weekly. Adjust these under Settings > Preferences if needed (e.g., exclude non-critical folders). Confirm your preferences to activate baseline protection tailored to your usage habits.
-
Run Quick Scan
Click the Scan Now button on the Scan Page. The tool will perform a comprehensive sweep of your system memory, registry, browsers, and files. A progress bar displays real-time detection stats, highlighting threats like keyloggers or adware. The scan typically completes in 3–4 minutes, depending on your drive size and system speed.
-
Review & Remove
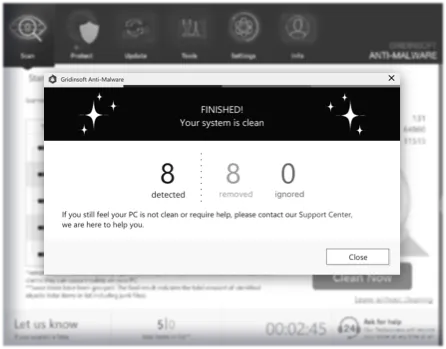
Post-scan, a detailed report categorizes threats by risk level (Critical, High, Low). Select Remove All to automatically quarantine and delete malicious items. For transparency, review flagged items under Scan Logs—each entry includes the threat name, location, and action taken. Restart your PC to finalize cleanup.
Stop an Active Infection in 3 Steps
-
Boot in Safe ModeFollow this quick guide:
Reboot your PC and press F8 (or Shift + Restart on Windows 10/11) to access Advanced Boot Options. Select Safe Mode with Networking to disable non-essential processes. This prevents malware from launching automatically, isolating the infection for easier removal.
-
Run Quick ScanFocus on critical areas (browsers, memory, startup)
In Safe Mode, open Gridinsoft Anti-Malware and select Quick Scan from the dashboard. This targets high-risk areas: running processes, startup entries, and browser extensions. The scan identifies active threats like ransomware or data stealers within 60 seconds, prioritizing immediate risks over full-system checks.
-
Quarantine ThreatsIsolate high-risk items before deletion.
Review detected threats and select Quarantine to isolate them from your system. Quarantined items are moved to a secure, encrypted folder, preventing further execution. After removal, reboot normally to exit Safe Mode and restore full functionality.
Set It and Forget It: Automated Defense
-
Schedule ScansDaily/weekly automated checks.
Navigate to Settings > Scheduled Scan. Toggle Scheduled Scans and choose frequency (daily/weekly) and time (e.g., during lunch breaks). Scans run silently, and results are logged for later review.
-
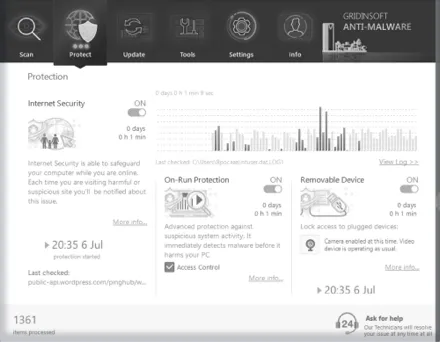
Enable Real-Time ShieldsToggle on browser/network monitoring.
Under Protection, activate Internet Security to flag suspicious connections. Activate On-Run protection to block malicious scripts. Customize Ignore List via Tools to avoid interruptions during work.
-
Update SettingsEnable auto-downloads for threat databases.
Ensure Auto-Update is enabled in Settings > Update. The tool checks for threat database updates hourly, ensuring defenses stay ahead of rising threats. Manual updates can be triggered under Update > Check for Updates.
Tailor Your Defense: Expert Mode
-
Custom ScansTarget specific folders/processes.
Navigate to Scan->Custom Scan, select specific folders (e.g., Downloads, Temp), file types (EXE, DLL), or processes to scrutinize.
-
Adjust HeuristicsSet sensitivity levels to reduce false positives.
In Settings->General, modify heuristic sensitivity from Low to Aggressive. Higher levels detect unknown threats but may increase false positives. Use Ignore List to exclude trusted files flagged incorrectly.
-
Export ReportsSave logs for IT teams or audits.
Post-scan, click Tools->Scan Logs to access all the completed scans. Click Save As... to share these with IT teams for audits or compliance checks. Reports include timestamps, threat hashes, and remediation actions.
Restore Your PC After a Malware Attack
-
Run Full ScanRemove residual files/registry entries
After removing malware, select Scan->Full Scan. This will search for residual files (temp data, cookies) and repairs registry entries corrupted by the infection. It Helps to reclaim disk space and stabilize performance.
-
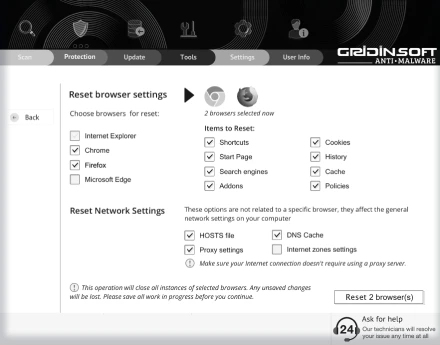
Reset BrowsersUse built-in tools to undo hijacked settings.
Use tools to change passwords for compromised accounts (email, banking). Enable two-factor authentication (2FA) where possible.
-
Audit AccountsCheck for compromised passwords.
Use tools to change passwords for compromised accounts (email, banking). Enable two-factor authentication (2FA) where possible.