Types of Email Spoofing
Email spoofing, also known as spoofing email, involves forging the sender’s email address. Often, the address in the sender’s field is fake; any responses sent to this address will likely reach a third party. The primary goal of this scam is to deceive the user.
Fraudsters deploy a variety of tactics to execute a successful spoofing attack 1. Below, we explore the most common methods they use.
1. Sharing a Similar Domain
To successfully spoof an email, fraudsters meticulously imitate sender addresses that appear similar to those of well-known organizations or companies. They typically:
- Alter the top-level domain, for example, from [email protected] to [email protected]
- Change the domain to include a country code, for example, [email protected]
- Modify a single character in the domain name, turning [email protected] into [email protected]
- Use a variant of the domain that still references the brand, such as [email protected]
- Create an email address that incorporates the company’s name, like [email protected]
2. Substituting the Sender’s Name
This tactic involves falsifying the sender’s name, with the “From” and “Reply-To” headers displaying the fraudster’s address instead. This method is particularly prevalent on mobile mail clients, which typically only display the sender’s name. Fraudsters may use:
- Misleading variations of the company’s name.
- Fabricated names paired with deceptive email addresses.
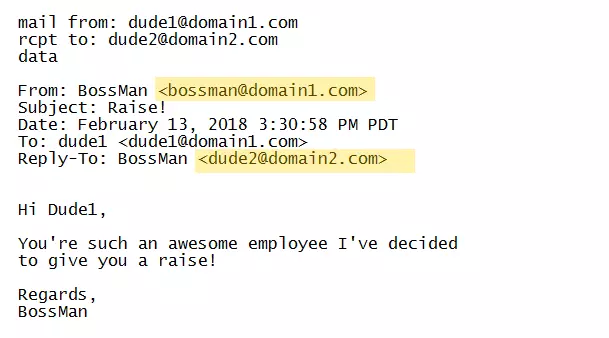
Imagine that you receive an email like this:

Notice that all fields are correct, but the From and Reply-To fields are not. When Dude1 receives this email, he may think it’s from his boss. When he hits “Reply,” all he’ll see in the To: field is the name “BossMan,” but it will actually go back to his friend who spoofed the email, Dude2.
3. Changes the significance of the From and Reply-to fields
Because the SMTP protocol does not authenticate headers, fraudsters can easily forge addresses in the From and Reply fields without being noticed. Thus, they have the privilege of not being caught, as a fake is almost no different from the original.
Protection from Email Spoofing
To effectively guard against email spoofing, it’s essential to configure email security protocols such as SPF, DKIM, and DMARC. Below, you’ll find step-by-step guides on how to set up these protocols for popular email platforms:
1. Setting Up SPF (Sender Policy Framework)
SPF helps to verify that incoming mail from a domain comes from a host authorized by that domain’s administrators.
- Gmail: Go to the Google Admin console, navigate to ‘Domains’, and then ‘Add a domain or a domain alias’. Add the SPF record in your DNS settings:
v=spf1 include:_spf.google.com ~all - Outlook: In the Microsoft 365 admin center, go to ‘Settings’ → ‘Domains’, select your domain, and add the SPF record to your DNS settings:
v=spf1 include:spf.protection.outlook.com -all
2. Implementing DKIM (DomainKeys Identified Mail)
DKIM (DomainKeys Identified Mail) adds an encrypted signature to outgoing emails, allowing the receiver to verify that an email was indeed sent and authorized by the owner of the sending domain. Setting up DKIM correctly can help prevent email spoofing by verifying the authenticity of the sender. Here’s how to set up DKIM for Gmail and Outlook:
Implementing DKIM for Gmail:

To configure DKIM for Gmail, use the following steps:
- Sign in to the Google Admin console.
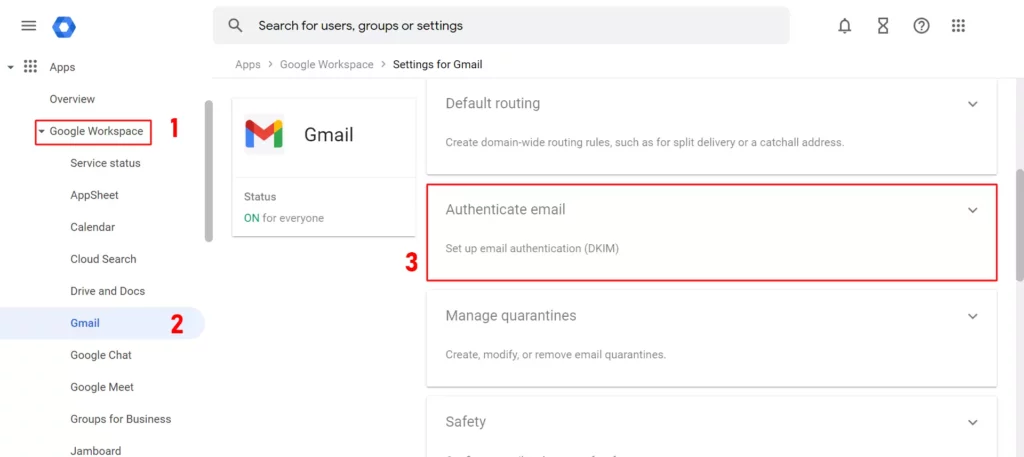
- Navigate to Apps → Google Workspace → Gmail → Authenticate email.
- Select the domain for which you want to set up DKIM and click GENERATE NEW RECORD. You might see this option only if you haven’t already set up DKIM for your domain.
- Choose a key length of 2048 bits for better security (1024 bits is also available but less secure).
- After generating the DKIM key, Google will provide you with a TXT record to add to your domain’s DNS. It will look something like this:
google._domainkey IN TXT "v=DKIM1; k=rsa; p=MIGfMA0GCSq...AB"
This is your public key.
- Add this record to your DNS settings at your domain host. Keep in mind that DNS propagation can take up to 48 hours.
- Once the DNS has propagated, return to the Admin console and click START AUTHENTICATION.
When DKIM is set up correctly, Gmail will sign outgoing emails automatically, allowing recipient servers to verify their authenticity.
Implementing DKIM for Outlook:
For users of Microsoft 365 or Outlook, the setup process involves similar steps:
- Login to the Microsoft 365 Defender portal.
- Go to Email & collaboration → Policies & rules → Threat policies → DKIM.
- Choose the domain you wish to enable DKIM for and click Enable.
- If no DKIM keys exist, Microsoft will prompt you to create them. Click on Create to generate the keys.
- Microsoft will then provide two CNAME records to add to your domain’s DNS. These records delegate the DKIM signing authority to Microsoft. They typically look like this:
selector1._domainkey.YOURDOMAIN.com CNAME selector1-YOURDOMAIN-com._domainkey.OURDOMAIN.onmicrosoft.com

selector2._domainkey.YOURDOMAIN.com CNAME selector2-YOURDOMAIN-com._domainkey.OURDOMAIN.onmicrosoft.com - Add these CNAME records to your DNS. Again, allow up to 48 hours for DNS changes to take effect.
- Once DNS propagation is complete, go back to the Defender portal and confirm the DKIM status to ensure it is active.
Implementing DKIM for your domain significantly improves your email security by enabling email authenticity verification at the recipient’s end.
3. Configuring DMARC (Domain-based Message Authentication, Reporting, and Conformance)
DMARC (Domain-based Message Authentication, Reporting, and Conformance) is an email authentication, policy, and reporting protocol. It builds on SPF and DKIM protocols, helping email receivers determine if a given message aligns with what the receiver knows about the sender. If not, DMARC includes guidance on how to handle these discrepancies. Here’s a step-by-step guide to setting up DMARC:
Understanding DMARC Policy:
Before setting up DMARC, you need to understand the policies you can apply:
Steps to Configure DMARC:
- Create a DMARC record: A DMARC policy is published as a DNS TXT record. The typical format of a DMARC record looks like this:
v=DMARC1; p=none; rua=mailto:[email protected]
In this example, ‘p=none’ specifies the policy, and ‘rua’ indicates where aggregate reports of DMARC failures will be sent.
- Choose Your Policy: Decide which policy (none, quarantine, reject) fits your needs based on your security posture and the maturity of your SPF and DKIM setups.
- Specify Email Reporting: Determine where you want reports of pass/fail to be sent. These reports are crucial for understanding the types of attacks targeting your domain and observing how your emails are being received on the internet. Use ‘rua’ for aggregate reports and ‘ruf’ for forensic reports:
rua=mailto:[email protected]; ruf=mailto:[email protected]
- Publish the DMARC Record: Add the DMARC TXT record to your domain’s DNS. This is similar to adding SPF or DKIM records. You typically enter the record into your DNS management dashboard.
- Monitor and Adjust: After implementing DMARC, monitor the reports you receive and adjust your policy as needed. Initially starting with a ‘none’ policy and moving to ‘quarantine’ or ‘reject’ as you confirm that legitimate emails are passing SPF and DKIM checks is a common approach.
Additional DMARC Tags:
DMARC records can include several optional tags to refine its operation:
- aspf: Alignment mode for SPF (strict or relaxed).
- adkim: Alignment mode for DKIM (strict or relaxed).
- fo: Forensic options to specify conditions under which forensic reports should be generated.
- rf: The format to be used in forensic reports.
- ri: Reporting interval for how often you want to receive the aggregate reports.
- What Is Email Spoofing? Read here


